Contents
Handbook
How to pose, light and export your characters in JustSketchMe.
Start here
- Pick a character. The app starts with one. Add more from the
Charactersmenu. - Pose it. Click a coloured dot on a joint, then drag a ring to rotate it.
- Frame it. Drag the background to orbit and scroll to zoom. See Camera for touch controls.
- Light it. Press W, select the yellow sphere, then drag its arrows.
- Export it. Press P to save a transparent
.png.
The app at a glance


- Menu bar: on a narrow screen, swipe sideways to see the rest. See Menus.
- Posing tools
- Toggles: mirror posing, then camera position and lock camera (see Camera).
- Upgrade to Pro: see what's included, or enter your key.
- Tabs: one for each character and prop.
- Light source: the yellow sphere. It can start off screen on a phone, so zoom out if you can't see it.
- Joints: click a dot to select that joint.
- Hand editor: click the pink sphere by a hand.
Prefer to watch? These videos show an older version of the app, but the basics are the same.
Pose a character
The four posing tools
| Tool | Key | What it does |
|---|---|---|
 Rotate |
Q | Rotates joints and props. |
 Move |
W | Moves characters, props, whole limbs and the light. |
 Scale |
E | Resizes characters and props. |
 Hide tools |
R | Hides joints and gizmos so you can check your pose. Pick another tool to bring them back. |
Rotate a joint
With the Rotate tool, select a joint. Drag a coloured ring to rotate around that axis, or drag inside the sphere to rotate freely.
Pose a whole arm or leg
With the Move tool, select a hand or foot and drag it. The rest of the limb follows.
Pose fingers and hands
- Pose each finger: click the pink sphere next to a hand to zoom in. Click
Exit hand editoror press Esc to go back. - Use a hand pose Pro : in the
Handsmenu, clickLeftorRighton a pose to apply it to the selected character.
Use a ready-made pose Pro
Select a character, then click a pose in the Poses menu's library of hundreds.
Mirror left and right
 J copies joint rotations to the character's other side as you pose.
Set up the scene
Add a character or prop
- Characters: the
Charactersmenu is grouped intoBase,Stylised,Realistic,FantasyandOther. Some need Pro. - Props: the
Propsmenu has free basic shapes for blocking out a scene. Prop packs Pro add weapons, animals, decor, environments and more.
Select, hide or lock an object
Every character and prop has a tab in the top left. Click a tab, joint or object to select it. Click the background or press Esc to deselect.
- Hide H: gets an object out of the way while you work.
- Lock K: stops accidental changes. Locking a character also hides its joints.
- Object menu: click
…on a tab, or right-click it, to change colour, duplicate, flip, delete and more. TheEditmenu has the same actions for whatever is selected.
Move and resize
- Move W: drag an arrow to move along one axis, or a square to move along a plane.
- Scale a prop E: drag an axis to stretch it, or a corner square to scale evenly.
- Scale a character E: use the
Scaleslider at the bottom of the screen. Characters scale from their feet, so they stay on the ground.
Lighting
- Move the light: select the yellow sphere with the Move tool, then drag its arrows.
Reset lightin theViewmenu puts it back. - Ambient lighting (
Viewmenu): even light from everywhere. Higher values soften shadows. - Spot lighting (
Viewmenu): light from the yellow sphere. Higher values deepen shadows. - Hard shadows (
Settingsmenu): shows more shadow detail, but can slow down older devices.
Attach a prop to a character
Attach a prop to a joint so it moves with the character, like a sword in a hand.
- Choose
Attach to characterfrom the prop's object menu. - Select the joint.
- Choose whether to snap the prop to it.
To undo it, choose Detach from character.
Reshape a body Pro
Add Adjustable male or Adjustable female from the top of Base, then choose Adjust proportions from its object menu.
Upload your own Pro
Use the Props menu. Files can be up to 8mb.
- Upload image:
.png,.jpg,.webpor.gif. Transparency is kept, so an image can be a prop or a background. - Upload prop: an
.objmodel.
You can also drag .png, .jpg and .obj files onto the app.
Camera
| Action | Mouse and keyboard | Touch |
|---|---|---|
| Orbit | Drag the background | Drag with one finger |
| Pan | Right-drag | Drag with two fingers |
| Zoom | Scroll | Pinch |
| Orbit around the selection | F | View → Focus on selection |
 Save the view |
Hold the button, or Shift+C | Hold the button |
| Return to the saved view |
Click the button, or C | Tap the button |
 Lock the camera |
Click the button, or L | Tap the button |
A saved view keeps the position, angle and field of view. Until you save one, returning goes to the starting view.
For dramatic perspective (think giant fist in the foreground), widen View → Field of view.
Save and export
Export an image
Go to Export → Take screenshot, or press P, to save a transparent .png.
Save to the cloud Pro
Saves sync across your devices.
- Scene: click
Save scenein theScenesmenu, or press Ctrl/⌘+S. This saves characters, props, lighting and camera. Click a saved scene to load it. - Pose: select a character and click
Save posein thePosesmenu. Click a saved pose to apply it.
Export a 3D model Pro
Go to Export → Export 3D model to download the selected character as an .obj. You can't export a whole scene yet.
Clear scene in the Edit menu can't be undone.Install the app
JustSketchMe runs in any web browser. Installing it from the browser gives you the full app, not just a bookmark.
iOS
Download it from the App Store. Or open app.justsketch.me in Safari, then tap Share → Add to Home Screen.
To use an existing license key in the App Store app, tap Upgrade to Pro → Get JustSketchMe Pro → Already subscribed?.
Android
Open app.justsketch.me in Chrome, open the browser menu  , then tap
Add to Home Screen.
Mac
Windows
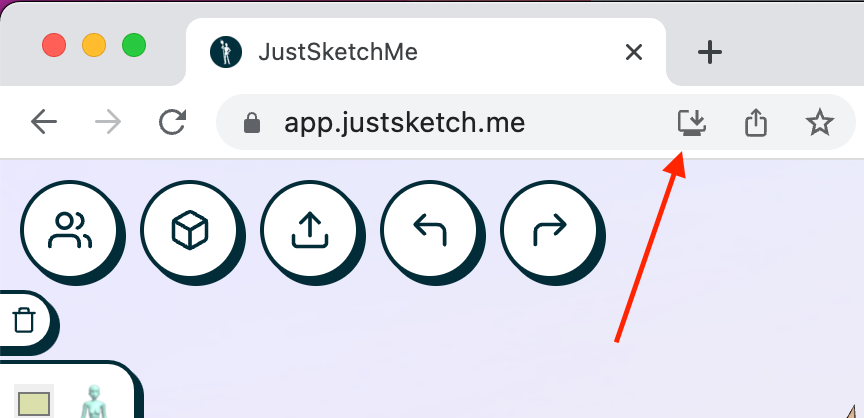
Open app.justsketch.me in Chrome, click the install button at the right of the address bar, then Install JustSketchMe.
Pro and billing
JustSketchMe Pro is a subscription or a one-time purchase.
Free vs Pro
| Free | Pro adds | |
|---|---|---|
| Characters | Adult, teen, tween, child and baby figures | Stylised, realistic, fantasy and adjustable bodies |
| Posing | All posing tools, the hand editor and mirror posing | Pose library and hand poses |
| Props | Basic shapes | Prop packs, your own images and .obj models |
| Scene | Lighting and camera controls | |
| Saving | Your current scene, in this browser | Cloud saves across devices |
| Export | Transparent .png |
3D model (.obj) |
Activate Pro
Your license key is your login. Click Upgrade to Pro, paste your key into Already have a license key? and click Activate.
Use Pro on several devices
Copy your key from Settings → Account and activate it on your other devices. Saved poses and scenes sync between them.
Lost license key
Search your inbox for "JustSketchMe" to find the email from Gumroad or LemonSqueezy. Your key is also in your LemonSqueezy orders or Gumroad library.
Cancel subscription
To update your payment details or cancel, use any of these:
Settings→Accountin the app- Your LemonSqueezy orders or Gumroad library
- The link in your receipt email
If you subscribed through the Apple App Store, use your device's App Store settings.
Common problems
- Clicking something opens the upgrade screen. That feature needs Pro. See Free vs Pro.
- The joints have disappeared. Pick a posing tool to leave Hide tools, or check that the character isn't locked or hidden on its tab.
- The camera won't move. Press L to unlock it.
- The app is slow. Turn off
Hard shadowsin theSettingsmenu. - Will I lose my scene if I close the app? No. Your current scene comes back next time on the same device and browser. Use cloud saves to keep several scenes or open them elsewhere.
- Does it work offline? Yes, once you've opened it online. Characters and props you haven't loaded yet need a connection.
Reference
Keyboard shortcuts
Press ? in the app to see these at any time.
| Shortcut | Action |
|---|---|
| Q / W / E | Rotate / Move / Scale |
| R | Hide tools |
| J | Mirror posing |
| L | Lock camera |
| C / Shift+C | Restore / save camera position |
| F | Orbit around selection |
| H | Hide or show selected |
| K | Lock or unlock selected |
| G | Place selected on ground |
| M | Flip selected |
| Delete / Backspace | Delete selected |
| Esc | Deselect, close menus, exit hand editor |
| P | Take screenshot |
| Ctrl/⌘+Z | Undo |
| Ctrl/⌘+Shift+Z or Ctrl/⌘+Y | Redo |
| Ctrl/⌘+S | Save scene |
| ? | Show shortcuts |
Menus
| Menu | What's in it |
|---|---|
View |
Posing tools, camera controls, lighting, field of view, Reset light |
Edit |
Undo, redo, the selected object's actions, Clear scene |
Characters |
Every character you can add |
Props |
Basic shapes, prop packs, uploads |
Poses |
Pose library, saved poses |
Hands |
Ready-made hand poses |
Scenes |
Saved scenes |
Export |
Take screenshot, Export 3D model |
Settings |
Language, dark mode, hard shadows, outline effect, floor grid, Reset app settings, Account |
Help |
Getting started guide, keyboard shortcuts, links to this site |