Docs
Instructions on how to make awesome things with JustSketchMe
Table of contents
- Models
- Transform tools
- Tab tools
- Lighting
- Scene tools
- Poses
- Scenes
- Props
- Other tools
- Export options
- Apps
- Subscriptions
- Creating character models
Models
There are many different models and characters that are available. The scene comes loaded with the female base model by default. You can add more characters and models to the scene by selecting the  button in the top left, and selecting a model. There are different categories of model in selectable tabs along the top.
Transform tools
Transform tools are tools that allow you to manipulate objects (models or props) in the scene. They can be thought of as different modes of interacting with the scene. They can be found at the bottom left corner of the screen. Once a gizmo is selected you can select a joint or object by clicking it. Right clicking or clicking away will deselect that joint or object.
Rotate

This tool allows you to rotate any joint on a character model into the desired position. This is used to posing the models and rotating props. It is the mode that is active by default and can be re-activated by selecting the button or using the shortcut Q . You can select and drag an individual axis (the coloured circles) or free rotate by selecting anywhere inside the sphere and dragging.
Move

This tool allows you to move a character model or prop around the scene. Activate it by selecting the button or using the shortcut W. You can select and drag an axis to move it on one axis, or select the square to move it along a plane (2 axis).
Scale

This tool allows you to scale a character model or prop. Activate it by selecting the button or using the shortcut E. You can select and drag an axis to scale it along just that axis. Use the semi-transparent squares at the end of each axis to scale the whole model uniformly.
Tab tools
These tabs show up in the left side of the screen when new objects are added to the scene. They have tools specific to those objects in them. You can select the model by clicking the image in the tab.
Duplicate

This will duplicate the object in the scene and create a perfect copy next to it. This is useful for creating multiple props for repetitive constructs (think bars of a prison cell), or for generating multiple characters doing the same thing (think marching soldiers).
Flip

This will flip your model horizontally for a perfect mirror image. This is useful for mirroring poses from the pose library (think running).
Hide model

This will toggle the visibility of the object in scene so you can hide it while not working on them to keep your workspace cleaner. This prevents clutter and accidental manipulation.
Lock model

This will toggle the ability to modify an object so that your scene is cleaner when working on other elements. It prevents accidental manipulation of models you're happy with.
Place on ground

This will place the selected object on the ground (floor grid). This can also be done with the shortcut J.
Delete

This will remove the object from the scene.
Lighting
The program gives you granular control over the scene lighting intensity, direction and type.
Move light source
There is a yellow sphere in the scene that once selected can be moved around the scene using the move gizmo.
Adjust ambient light
In the settings menu  in the top right there is a slider to adjust the ambient light 🔆 intensity. Ambient lighting removes shadows as the intensity increases.
Adjust spot light
In the settings menu in the top right there is a slider to adjust the spot light 💡 intensity. The spot light direction comes from the position of the light soure in the scene. Spot lighting creates shadows as the intensity increases.
Hard/soft shadows
In the settings menu in the top right you can enable or disable hard shadows 👤 on the model. Hard shadows give more shadow information. Note that enabling hard shadows may cause lagging on older devices.
Scene tools
These tools give you access to extra functionality in the scene and can all be found in the settings menu in the top right.
Dark mode
🌚 Toggle dark mode gives a dark background and menus for reducing eye-strain.
Outline effect
🖊 Toggling the outline effect disables or enables the dark outline effect on all the objects in scene.
Floor grid
🌐 Toggling this option enables or disables the floor grid in the scene.
Adjust field of view
🎥 This slider allows you to set a more extreme field of view to get more intense perspective in the scene (think giant fist perspective).
Poses
Poses are how character models are posed according to the rotation of their joints. When you rotate a models joints you are "posing" that model.
Save/load poses
When you're happy with a pose and want to save it for later use, open the pose menu  in the bottom right and click
 Save pose. This will save your pose in the cloud and you will see it appear beneath the save button. Giving the pose a category when you save it will group your related poses together in an accordion menu.
You can load that pose by clicking the saved pose.
Pose library
The pose library has 200+ pre-built poses for you to use. It can be found in the pose menu by selecting the Pose library tab. Select a character then click the pose in the pose library to apply it to that character.
Hand pose library
There are 20+ pre-built hand poses so that you don't need to fiddle around with all the niggly little joints on the hands. These can be found in the hand pose menu  in the bottom right. Click either
 Left or Right to apply that pose to either the left or right hand of the model.
Scenes
Full scenes with models, props, light settings and perspective info can be saved and revisited at a later time or on another device.
Save/load scenes
Saved scenes are snapshots of the scene at the time of saving. This is slightly different from, say, Photoshop.
When you're happy with the layout of your scene you can save it by going to the scenes menu  in the bottom right of the screen and clicking
 Save scene. The scene name will then appear beneath the save button and can be loaded by clicking it. You can group scenes together using categories when saving. This will create an accordion menu of scenes.
Props
Props are shapes and objects that can be scaled and moved around in scene to illustrate certain things. They can be used to create large backgrounds (think buildings), or smaller foreground objects (think tables or coffee cups).
Adding props
Open the props menu  in the top left corner of the screen and select the shape or object you would like to import into the scene.
Props can also be uploaded by opening the upload menu  and selecting
 Upload prop. Note that only .obj files can be uploaded.
Transforming props
Props can be modified using the gizmos in the bottom right corner. The props can be scaled along certain planes, moved around, and rotated according to the specific function of the prop.
Attaching props to characters
Props can be attached to any joint on a character (eg: attaching a sword to a hand) so they move/scale together when posed or transformed. This can be done by tapping and holding on the prop, then selecting the joint to attach it to, or using the  button in the tabs on the left.
Once you select a joint, you can move the prop to the joint by following the prompt, or leave it as is.
Images as props
Images can be uploaded and used as props. Select the upload image button in the top left and select an image from your device to upload. Note that no images larger than 2mb are allowed.
Image props handle transparency so can be used as props (think a picture of a sword as a sword prop). They can also be scaled up and used as a background image to help with perspective.
Attach prop to joint
Tap-and-hold a prop then select a joint on a character to attach that prop to the character joint. This allows you do move and modify the character without having to reposition the prop each time.
Other tools
There are a few other tools that are useful for setting up a scene.
Undo/redo
These two tools work as expected, undoing or redoing the last action. They are available using  or
or  in the top left, or using
 Ctrl+Z or Ctrl+Shift+Z.
Mirror posing mode
This tool, when toggled, mirrors the joint rotation of a character between the left and right sides. It can be toggled on using the  button in the top right, or using the shortcut
 J.
Save and restore camera position
This tool is used to save a camera position to be restored later. This allows you to set your ideal viewport which you can easily return to later.
A long (1 second) hold of  in the top right will save the camera position, rotation, and field of view. A single tap of the same button will set the camera to the saved state.
Hide all tools
This tool hides all the joints and active gizmos in the scene so you can observe it without all the clutter. Select the hide tools button in the top right corner or using the shortcut K to toggle.
Lock screen
This tool locks the camera of the scene in place so as to not accidentally move it if you've found the perfect perspective. You can toggle the camera lock using the button in the top right of the screen or using the shortcut L.
Export options
There are multiple ways to export scenes and objects.
Take screenshot
To take a screenshot of the scene with transparency open the export menu  and click
 Take screenshot. This will save the screenshot as a png image.
Export 3D model
To export the selected character as a 3D model open the export menu and click either Export model as .dae or Export model as .obj.
Note that full scene 3D model exports are not available just yet. You can currently only export the active character model in the scene.
Apps
JustSketchMe runs on all devices in web browser, as well as locally on all devices either as a Progressive Web App, or as a native application.
iOS
The iOS app is available on the Apple App store. You can follow this link or search justsketchme.
If you have an existing license key:
- Select
Upgrade - Select
Get JustSketchMe Pro - Select
Already subscribed?and follow the steps
Android
To download the app on Android:
- Open the JustSketchMe webapp in Android Chrome
- Open the browser settings menu
 in the top right toolbar
 - Tap
Add to Home Screen - Confirm the download
- This is not just a bookmark, it downloads the full app
JustSketchMe is built as a progressive web app (PWA) and runs as a native app on Android when downloaded.
Mac
Download the Mac App here.
Windows
To download the app on Windows:
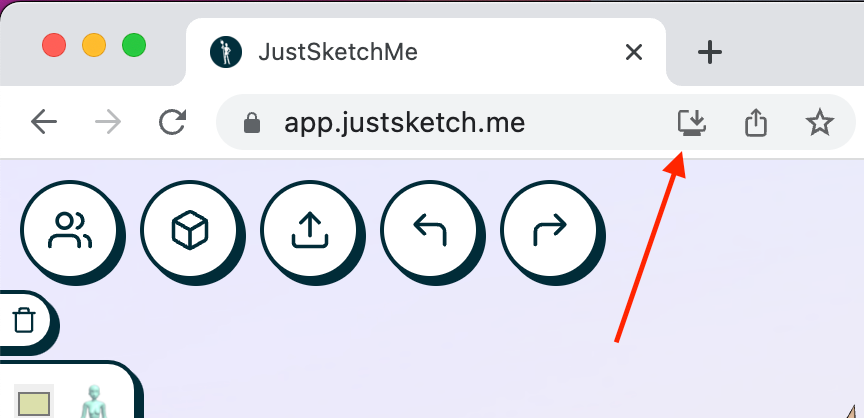
- Open the JustSketchMe webapp in Chrome
- Click the download button to the right of the URL
- Click
Install JustSketchMe - This is not just a bookmark, it downloads the full app
JustSketchMe is built as a progressive web app (PWA) and runs as a native app on Windows when downloaded.
Subscriptions
JustSketchMe Pro is a subscription or a one-time purchase which gives you access to the full functionality of the webapp. You can learn more about it by selecting the Upgrade button in the top right of the app screen and select Get JustSketchMe Pro!.
License key
License keys act as your "login". Activate your application by clicking the Upgrade button in the top right of the screen and pasting your license key into the License key field and clicking Activate.
Devices
Your license key can be used on all of your devices. Your saved pose and scene information will be shared between all of the devices activated with your license key.
Concurrent sessions
Each license key can be activated on up to 3 devices of the license key holder (this is also how pose and scene libraries are synced). More than 3 concurrent sessions will boot the sessions and flag that account as potentially leaked on the internet. Keep your license keys safe.
Manage/Cancel subscription
Licenses are handled by either Gumroad or LemonSqueezy. To manage your subscription you'll need to find the receipt email in your inbox by searching "JustSketchMe".
You can also manage it from your LemonSqueezy orders or your Gumroad library.
If you are using the Apple App, subscription management is handled on the Apple App store on your device.
Creating character models
Characters developed for the JustSketchMe app are a bit tricky and have a few constraints that need to be followed. Here is a working character model which can be used for reference.
Constraints
- The character model should be exported as a
.fbx. - Sizing of the character should be in proportion to the example model.
- All joints should be zeroed out in a t-pose.
- This includes hand and thumb joints (again, refer to the example model for reference).
- Joints should follow the Mixamo naming pattern of
mixamorigLeftUpLeg(again, refer to example model). - There should be no textures on the model (textures are generated in-app)
- The mesh should be one single mesh.
- Max size should be around 2.5mb
- The body should warp naturally in a variety of poses (testable with the pose library)
Helpful advice
When creating new characters it may be easier to take the example model, unskinning it and using it's skeleton as a base. Then all you need to do is translate the joints to the new model and skin/weight paint.
Testing
The models can be tested in the developer menu (you'll be issued a passcode).
In the developer menu select Tests then Test fbx. Note this only works on Chrome for some reason.